A Quick Guide on How to Make Pendants
Written by Annabelle
June 18, 2020
Pendants and charms are easily the most convertible form of jewelry there is! From precious gemstones to sentimental oddities such as coins, brooches, and even ashes and baby teeth, it's time to get creative and work on your own jewelry style with these innovative ideas below. Read on to learn how to make pendants.
Pendant Conversion

A client's family heirloom, before and after conversion into a necklace.
Making things into pendants isn't too difficult! The first thing to think about is how you want to wear the pendant. Do you want a loop at the top? Do you want it to slide around on a chain with a loop on the back of the design? Or do you want to have it fixed in the center of a chain with two loops on either side, like a bar pendant?
Once you've decided on how you want to wear the pendant, it's time to evaluate the item you want to make into a pendant.
How to Make Pendants With Popular Items
The best thing about pendants is their versatility. You can get creative with a variety of objects, and we've separated the standard jewelry items from less common conversions. Take a look at the list below for some cool ideas!
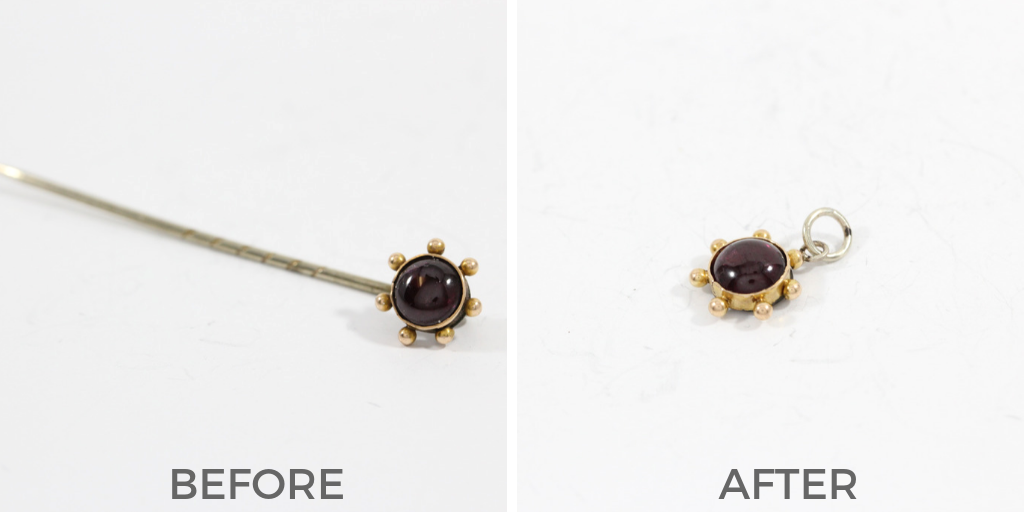
- Brooches and stickpins: For all lovers of vintage jewelry who hate making holes in their clothing, you'll be happy to know that brooches and stickpins are extremely easy to make into pendants. A jeweler simply has to remove the pin components and attach a jump ring to the brooch in the desired orientation. For stickpins, it's even more simple if you request for the jeweler to use the metal from the pin portion and twist it into a loop at the top of the design.
- Single earrings: Lost an earring and not sure what to do with the remaining half? Have it converted into a pendant if you like the design! Again, the jeweler just needs to remove the earring components and modify the design for a chain to go through.
- Rings: Baby rings that don't fit can become little sentimental pendants! Simply slip it onto a chain, or if you want to hang it a particular way, ask the jeweler to add another jump ring.
- Beads: Beads can be made into pendants via a bail attachment for a horizontal orientation, or a wire for vertical orientation. The jeweler simply inserts metal through the bead and ensures that there's a loop at the top for a chain.
- Loose Gems: We love using loose stones! You can either opt to have it set into a ready-cast setting, or splurge on a custom creation of your own.

A gold cross that we changed into a reversible pendant with diamonds and gemstones on each side.
- Coins: Yes, we did say coins. Right now coin jewelry is a huge trend, so you can look into buying an ancient coin online for a touch of history, or use a special lucky coin that has meaning to you! A jewelry can either bezel set or prong set the coin for you.
- Buttons: You'd be surprised by the amount of vintage buttons people like to use for pendants. The designs are often quite pretty! Keep in mind that the jeweler may not be able to perform any metalwork on the button due to its material, so you may have to settle for a bail made from wire work instead.
Cost and Turnaround Time
Depending on the conversion, it'll range from $20 for a simple jump ring to $55 for a full metalwork conversion for brooches. If the jeweler has to source components like settings and chains, expect the price to go up accordingly. Custom creation starts at $250 and goes up based on the metal and labor required.
As for turnaround time, simple conversions take 2-3 days. Custom creation takes 2 weeks for casting.
Now you're all set on how to make pendants! If you have some projects you want to get started on, comment below and we'll help you out!